Categories
WordPress

Add the Google +1 Button to a WordPress Blog in 2 Minutes

Google has introduced its +1‘ button. The Google Plus One button can help get more traffic to your website. This article gives the exact steps to get a Google Plus One button on your WordPress blog in two minutes.

Why It’s a Good Idea to Get a +1 Button on Your WordPress Blog Fast!

The +1 button is a very fast way for people to tell Google that “This webpage is good”. If you have a +1 button on your blog and someone clicks it, it’s a vote for your webpage.

When the +1 button is clicked, Google puts a link to your blog from that person’s public Google profile. This improves your web page’s Search Engine Optimization (SEO). Your search engine rankings are likely to improve, and so you are likely to get more visitors to your webpage.

If you don’t put a +1 button, other sites in your area that do have a +1 button are likely to bubble up ahead of you in search rankings.

I decided to not wait to get the design for my +1 button perfect. I wanted a +1 button on my blog now, and make the formatting perfect later. Here’s how I did it.

Google +1 Button Installation Steps for WordPress Blogs

  1. Log in to your WordPress blog. Your WordPress user will need to have Administrator privileges.
  2. Click the Plugins link. The Plugins link is in the left hand column of the web page after you log in, between Appearance and Users.
  3. Click the Add New button. It’s at the top of the page, just after the word “Plugins“.
  4. Enter “google plus 1into the search box.
  5. Click the Search Plugins button.
  6. Find the plug in named “WordPress plugin – Google +1 Button“.
  7. Click Install Now underneath that plug-in’s name.
  8. Click Ok to confirm installation of the plug in.
  9. Click the Google+1 link in the left-hand column at the bottom, under Settings.
  10. Choose your settings. For example the +1 button’s size, location, and whether the button shows a count of +1’s the post received so far. The button’s positioning and appearance can also be tuned using the Styling field if you know how to use CSS.
  11. Click Save Changes to confirm your settings.
  12. That’s it! Your WordPress blog now has a Google +1 button.

Is “Google +1 Button” the Best +1 WordPress Plugin?

I tried four WordPress plugins to put a +1 button on my posts. They all worked well.

I had specific desires: I am already showing a Tweet button in my posts using the WP Tweet Button plugin. The button floats nicely in the post text at the top and bottom of articles. I wanted a +1 button that would play nicely with the Tweet button, without me having to mess around with my WordPress template (a customized Twenty Ten) or stylesheet code.

Here are some notes on the plugins I tried:

The Twitter Facebook Social Share provided Twitter Tweet This, FaceBook Like, and StumbleUpon Share, as well as the Google +1 button. This was attractive – I would like FaceBook and StumbleUpon buttons, but I haven’t been able to stomach the giant rows of eight share buttons, or the AddThis button, that has 100+ sharing options. This plugin could put the buttons in a row at the top or bottom of an article, or alternatively at the side of the page. The floating the buttons at the side of the article, outside of the page’s visual borders was interesting, but it created a sense for me of the buttons being disassociated from the article. This plugin couldn’t float the buttons inside the article text, which is what I wanted, so I left it alone.

The Plus One Button plugin by Michael Fields appears to be professionally developed, for example it’s HTML 5 compliant and the code is hosted on the programmer’s darling site GitHub. The configuration screen was excellent and it worked well. The button had too much space around it for my template, and it didn’t work well visually with my Tweet button. I could have fixed it, but I wanted a +1 button working pronto!

The Add Google Plus one Social Share Button by Rohan Pawale looked promising. Rohan was thoughtful enough to load the JavaScript for the +1 button at the end of the webpage, which improves the time to load webpages. The same technique is used very widely to reduce the page load time cost of using Google Analytics. The other plugins may load the +1 button JavaScript at the end of the page, but no others I saw noted this as a feature. Again, the formatting didn’t look good with my Tweet button, so I had to move on.

WordPress plugin – Google +1 Button is the one I picked. Its formatting looked okay the Tweet button provided by the WP Tweet Button plugin. I could put a +1 button floating in the text at the top and bottom of posts. I had the option of cleaning up the styling easily later with the plugin providing a text box for entering custom CSS styling. It doesn’t have the flashiest administrative interface, but it works.

All the +1 WordPress plugins I tried supported changing the location and size of the +1 button, as well as choosing whether the count of +1’s received is displayed. Any of these three plugins, or the other +1 plugins may work well for you.

Was this article useful? If so, please click the +1 button below!

Categories
Twitter

Twitter is Over Capacity – The Fail Whale Rides Again

“Twitter is over capacity” – yes. Twitter’s got troubles. The Fail Whale rides again!

The Twitter Fail Whale

The Twitter’s status page reports for around 9:45am Pacific time on May 5 2011:

We are currently experiencing elevated error rates. There may be intermittent issues loading twitter.com and Twitter clients. We are aware of the problem and taking action. Thanks for your patience!

Wait and hope it comes good?

Categories
PHP

PHP 6: Features, Release Date, Hosting and Download

This article covers PHP 6, including the status of its development, features, release date and download. There’s a section on each topic below. Links to PHP downloads and source code are included.

I’ve updated this article to include the effects of the release of PHP 5.4 and the timelines of the new PHP release process.

PHP 6’s Status

Several books have already been written and published about PHP 6, such as Professional PHP6 by Edward Lecky-Thompson & Steven Nowicki. Despite this, PHP6 does not exist yet. There is no PHP 6 beta or even alpha. PHP 6 does not exist.

To see that PHP 6 doesn’t exist yet, see PHP’s official Subversion page. Subversion, or svn, is the source code control software used for the development of PHP. There are instructions for getting the code for PHP 5.3 or 5.4, but not for any newer version:

PHP 5.3: svn checkout http://svn.php.net/repository/php/php-src/branches/PHP_5_3 php-src-5.3
PHP 5.4: svn checkout https://svn.php.net/repository/php/php-src/branches/PHP_5_4 php-src-5.4

As you can see here from the branches in the PHP source code the newest branch is PHP_5_3:

  FIRST_UNICODE_IMPLEMENTATION/	 296285	 16 months	 derick	 - Committing my session cookie patch; it's a bug fix and good to have in the h…
...
  PHP_4_4/	 295390	 16 months	 derick	 - Set-up externals for the Zend engine so 4.4 can at least be build from SVN a…
  PHP_5_0/	 284180	 2 years	 gwynne	 one more attempt at ridding us of some of those annoying mime types
  PHP_5_1/	 284180	 2 years	 gwynne	 one more attempt at ridding us of some of those annoying mime types
  PHP_5_2/	 311125	 2 months	 dmitry	 Fixed crash on recursive error handler invocation
  PHP_5_2_WITH_DRCP/	 284180	 2 years	 gwynne	 one more attempt at ridding us of some of those annoying mime types
  PHP_5_3/	 313616	 31 hours	 scottmac	 When we have a blocking SSL socket, respect the timeout option. reading from SS…
  PHP_5_4/	 313646	 3 hours	 stas	 No E_STRICT in production

(Older code branches omitted for brevity.)

There’s no PHP 6 code branch yet. Notice the FIRST_UNICODE_IMPLEMENTATION branch – the story behind this code branch, and why it delayed PHP 6 follows.

What does exist is an official todo for PHP 6, authored by Andrei Zmievski, which includes a rough list of PHP 6 features in the PHP Wiki.

UPDATE 21 July 2011: Now the PHP 5.4 Alpha has been released, a PHP 6 branch may exist for PHP’s developers without showing up on PHP’s public subversion. The code for PHP 5.4 did not show up on the sites above until the PHP 5.4 Alpha was released.

Reasons for Delays to PHP 6

The reasons for the delay to PHP 6 appear to be:

  1. Issues with Unicode support: The development team initially decided to use UTF-16 internally in PHP 6. This causes double memory usage for strings, more CPU usage and increased complexity of coding PHP 6. Using UTF-16 apparently took a lot of fun out of developing PHP, caused tension amongst PHP’s developers and slowed development. The choice to use UTF-16 was aborted by Rasmus Lerdorf, creator of PHP, in 2010. The developers restarted the Unicode implementation.
  2. PHP 5.3 took some PHP 6 features: PHP 5.3 included many of the features slated as desirable for PHP 6. This removed a lot of momentum for PHP 6.
  3. High Hopes: PHP 6 is a major version number change. It’s possible in a major release to make significant changes, including making breaks from the past. Agreeing and delivering major changes can take some time.
  4. Feature Set Not Finalized: Agreement hasn’t been reached on the features in PHP 6.0.
  5. Lack of Urgency: PHP works very well. There are no burning issues forcing the release of PHP 6.
  6. PHP 5.4 takes some PHP 6 features: Rasmus Lerdorf previously stated, when he scrapped PHP 6’s original Unicode implementation, that there may be a PHP 5.4 yet, or PHP may go straight to version 6. Jani Taskinen created a PHP 5.4 development branch on 11 March 2010, but this appears to be due to frustration as being able to move PHP’s development forward. The PHP 5.4 code branch is no longer there. There is however an official PHP 5.4 todo wiki, with Stanislav Malyshev as the tentative release manager. So it looks there will be PHP 5.4, which would push out the PHP 6.0 release further. UPDATE on 24 July 2011: The PHP 5.4 Alpha has been released, and it includes some features originally targeted for PHP 6.0, such as traits and the removal of register_globals and safe_mode.

PHP 6 Features

The likely set of PHP6 features is:

  1. Internationalization: Native Unicode – UTF-8 – to the core (strings, APIs).
  2. Performance: Page level (opcode) caching through moving Alternative PHP Cache (APC) into the PHP core. Native application caching.
  3. Break to label: Sending a break to a label (like a goto).
  4. Enhanced array indexing: Array indexing can be used to substring or take an array slice.
  5. Removed features: Magic quotes will be removed.

The are quite a few more minor features and changes in PHP 6.

PHP 6 Download

You cannot download PHP 6 yet. There is no PHP6 download available. When a PHP 6 download becomes available I will post the download link here.

The current production release of PHP is 5.3.6. PHP 5.3 can be downloaded from php.net/downloads.php.

An alpha version of PHP 5.4 is also available.

Once the PHP 6 alpha is released, snapshots of the development code will likely become available from snaps.php.net.

PHP 6 Release Date

There is no PHP6 release date set. PHP 5.4 is only just being released now.

There is a PHP release process which has been accepted by a team vote. The release process stipulates:

Beginning on June 28th, 2011, the PHP Group began following a timeline for when new versions of PHP will be released. [33] Under this timeline, at least one release should occur every month. Every one year, a minor release should occur which can include new features.
(Source: “PHP” on  Wikipedia.)

This means minor releases, such as PHP 5.4 to PHP 5.5 are now scheduled yearly. The timeline shown in the PHP release process also shows the PHP 6 release occurring in sync with this one year cycle.

Given the PHP 5.4 release is expected on 27 July 2011, the most likely date for the production PHP 6 release is one year after the PHP 5.4 release: late July or early August 2012.

If the PHP team do decide to release PHP 6 in 2012 (rather than just PHP 5.5) according to the release process we’d expect to see the first PHP 6 alpha in June 2012.

PHP 6 Hosting

People are already looking for PHP 6 hosting. As PHP 6 doesn’t exist, there are no PHP 6 hosting providers yet.

PHP is the defacto website programming language provided by web hosting companies. Some web hosting companies will be eager to provide an option for PHP 6 shortly after its release to be on the “cutting edge”.

PHP 6 will become more widely available as the popular hosting control panel vendors, such as cPanel and Plesk built in PHP 6 support.

If you have a virtual private server or a dedicated server, you will of course be able to install PHP 6 yourself.

References

  1. What is the Holdup on PHP 6?
  2. Resetting PHP 6
  3. PHP 6 Features
  4. Prepare for PHP 6

Comments

Something to add? Comments, questions, feedback, more information – please comment below.

Categories
CSS

Select Form Buttons in CSS – Techniques with Examples

This article covers two ways, the easy and the advanced way to select a button or buttons in a form with CSS. We give example HTML and CSS for each technique to select a form button or form buttons. The advanced way uses a CSS attribute selector.

The Easy Way to Select a Form Button in CSS

The simplest way to select a form button is by id. Consider the following HTML, a form with a “Date” text field, and button labelled “Check”:

<form>
    <input name="date" type="text" />
    <input id="check-button" type="button" value="Check" />
</form>

The easy way to select the “Check” form button in CSS is using the “#id” CSS selector syntax. The button is selected in CSS using the unique id “check-button” we gave it in the HTML:

#check-button { font-size: 16px }

Advanced: Using a CSS Attribute Selector to Select Form Buttons in CSS

While using an id on the button is easy, using lots of ids can make HTML markup for more complex pages with many elements dense and harder to read.

A cleaner, more elegant way to specify the button is to use a CSS attribute selector:

form input[type="button"] { font-size: 16px }

The attribute selector here is [type="button"]. This selector as a whole says “for all forms, select the input elements whose type attribute is button“. In other words, select all the form buttons in the page.

Using a CSS attribute selector, the id on the form button isn’t needed, so id="check-button" can be dropped from HTML markup above. Here’s the simpler HTML:

<form>
    <input name="date" type="text" />
    <input type="button" value="Check" />
</form>

Submit buttons will not be selected by this method. If you want to selected a submit button, see our coming article.

Select a Particular Form Button with CSS Attribute Selectors

To select a particular buttons, the button can be specified by its label text. Here we have a form with two buttons, “Check” and “Download”:

<form>
    <input name="date" type="text" />
    <input type="button" value="Check" />
    <input type="button" value="Download" />
</form>

To just select the button labelled “Check”, use a selector with [value="Check"]:

form#check-form input[type="button"][value="Check"] { font-size: 16px }

Submit buttons will not be selected by this method. If you want to selected a submit button, see our coming article.

Select All Form Buttons in a Particular Form with a CSS Attribute Selector

To select the buttons in a particular form, one way is to put an id on the form:

<form id="check-form" >
    <input name="date" type="text" />
    <input type="button" value="Check" />
    <input type="button" value="Double Check" />
</form>

After adding an id to the form, add the form’s id to the CSS selector using ‘#’, like this:

form#check-form input[type="button"] { font-size: 16px }

This selector specifies all the buttons in the “check-form” form. Submit buttons will not be selected. If you want to selected a submit button, see our next article.

Which Browsers Support CSS Attribute Selectors?

Attribute selectors are supported by standards based browsers.

I’ve tested these techniques in Firefox 4 (FF4, 4.0, 4.0.1), Chrome 11 (11.0),  Safari 5 (5.0.5) and Opera 11 (11.10).

With Opera there’s a caveat: one attribute selector worked input[value="Check"], but two input[type="button"][value="Check"] did not. I didn’t investigate Opera further.

Internet Explorer 6 (IE6) does not support attribute selectors.

Attribute selectors are supported by Internet Explorer 7 (IE7) and Internet Explorer 8 (IE8) only if the !DOCTYPE has been specified at the top of the webpage. Attribute selectors should work fine in IE9; I haven’t tested if a DOCTYPE is required.

I have tested these techniques on Safari on the iPhone, iPad and iPod running iOS 4.3 (4.3.2). They work great!

References

You can read more about CSS attribute selectors at W3C or w3schools.

Questions?

Did you want to select form buttons in a way that wasn’t covered here? If so, write a comment below, and I’ll do my best to answer your query.

Categories
Mac

Where are the Apache Configuration files on Mac? – httpd.conf

Here’s where to find httpd.conf on Mac. This is the httpd.conf location on Mac OS X 10.6 Snow Leopard and Mac OS X 10.7 Lion. This article also shows how to make the httpd.conf directory visible in the Mac Finder.

What is Httpd.conf?

Httpd.conf is the Apache web server’s main configuration file. Mac OSX ships with Apache installed. See Apache’s configuration docs for how to configure Apache.

Httpd.conf Location on Mac

On Mac httpd.conf location is in the directory /etc/apache2. You can access this folder through the Mac Finder or through the Mac Terminal.

Checked on OS X 10.7, 10.6.8, 10.6.7.

Httpd.conf Location in Mac Finder

You won’t normally see even the /etc/apache2 directory showing up in the Mac Finder. I tried looking in Macintosh HD, but /etc doesn’t show up.)

I found a tip at Codejacked on how to open hidden files in the Finder.

Here’s how to view httpd.conf’s directory in the Mac’s finder:

  1. In the Finder, click the Go menu, and choose Go to Folder…
  2. Type in /etc/apache2.
  3. Click Go.

The Finder will show the apache2 folder, and in it, you’ll see httpd.conf.

Httpd.conf Location in Mac Terminal

You can also get to the httpd.conf file through a terminal session, which is okay if your comfortable in the Unix shell (bash):

tazpro:~ taz$ cd /etc/apache2

tazpro:apache2 taz$ ls
extra		magic		original	users
httpd.conf	mime.types	other

Can’t Save Httpd.conf?

Httpd.conf is protected by OSX from being edited. If you open it with the TextEdit application for example, you won’t be able to save it. For details to bypass this security, see How to Easily Edit Httpd.conf on Mac.

Restart Apache to Apply Configuration Changes

Don’t forget you will need to restart Apache for your configuration changes in httpd.conf to be applied. To restart Apache on Mac:

  1. Go to the Apple menu and choose System Preferences.
  2. Click on Sharing.
  3. Untick Web Sharing.
  4. Tick Web Sharing.
Categories
Mac

How to Change a Mac’s Name in Four Clicks

Changing a Mac’s name is easy. Here’s how to change a Mac’s computer name is four clicks. A Mac name change will affect the name that other computers see when they’re browsing the local network.

I’ve tested this method on Mac OS X 10.7 Lion and Mac OS X 10.6 Snow Leopard (10.6.7 and 10.6.8).

The Mac computer name is sometimes called a network name,  or even a host name or hostname, which comes from OS X’s origins in Unix.

Here’s how to change a Mac’s name:

  1. Click and hold the Apple menu and choose System Preferences…
    To open the Apple menu, click on the Apple icon at the top left of the screen.
    The System Preferences window will open.
  2. Click the Sharing icon.
    The Sharing icon is about the center of the widow.
    It is in the row titled Internet & Wireless.
    The contents of the window will change and
    the window’s title will change to Sharing.
  3. Click in Computer Name field and type the Mac’s new name.
    The Computer Name field is at the top of the window.
  4. Click the red circle at the top left of the Sharing window.
    The Sharing window will close.
    Your Mac’s name will change.

You’re done! – The Mac’s network name is now changed.

The source for this article is Change Your Mac’s Name at Mac Crazy.

This method was tested on Mac OS X Snow Leopard 10.6 (10.6.7).

Categories
PostgreSQL

How to Get the Size of a Postgres Table

To get a Postgres table’s size, run the following SQL. Size here means how much space the table’s data takes up on disk or SSD. The size is returned in an easy-to-read form, e.g. “865 MB” or “12 kB” – whichever is the closest unit.

You can run the SQL using tools such as psql, pgAdmin or phpPgAdmin.

The SQL to get a table size is:

select pg_size_pretty(pg_relation_size('the_table'));

Replace “the_table” with the table name you want to check.

The result looks like this:

 pg_size_pretty
----------------
 804 kB

Note that the size reported by the SQL above does not include the size of the table’s indexes. To find out more about getting a table’s size, see the source article Get the Size of a Postgres Table . This article also includes useful information, such as how to get the table size as an exact number of bytes, and why PostgreSQL’s table data sizes are always a multiple of 1 KB.

Categories
Ubuntu

Httpd.conf – What’s its Location on Ubuntu?

Here’s where to find the Apache 2 web server configuration file httpd.conf on Ubuntu.

Did you know that on Ubuntu, the main Apache configuration file is not httpd.conf? The main Apache config file is actually apache2.conf.

When Apache 2 reads apache2.conf, the contents of httpd.conf is included by an include directive in apache2.conf. Here’s the lines from apache2.conf that include httpd.conf:

# Include all the user configurations:
Include /etc/apache2/httpd.conf

So use httpd.conf on Ubuntu is specifically for your servers specific configuration. You may still need to want to edit apache2.conf at times, to change Apache’s configuration rather than add to it.

Httpd.conf Location

On Ubuntu, httpd.conf is located in the directory /etc/apache2. apache2.conf is also located in /etc/apache2.

Httpd.conf Location for Specific Ubuntu Versions

To ensure these locations are accurate, I’ve checked httpd.conf’s location on a number of different Ubuntu versions. The definitive article is Where is Httpd.conf’s Location on Ubuntu? at Ubuntu Gods.

Ubuntu Version httpd.conf Location
Ubuntu 7.04 Feisty Fawn /etc/apache2/httpd.conf
Ubuntu 8.10 Intrepid Ibex /etc/apache2/httpd.conf
Ubuntu 10.10 Maverick Meerkat /etc/apache2/httpd.conf

Additions & refinements welcome!

Categories
Taking Screenshots

The Easiest Way to Take a Webpage Screenshot

Do want to take a screenshot of an entire webpage, not just the part the webpage that fits on screen? This article describes how to take a full webpage screenshot using free software. This method will take a screenshot of a webpage, including the part below the fold. This method is automatic, and does not require manual scrolling.

This automatic method is much better than a manual scroll, shoot and stich process that many people still use:

  1. Take a screenshot of the visible part of the webpage.
  2. Scroll to the next part of the webpage.
  3. Take another screenshot.
  4. Repeat until there’s a screenshot of every part of the webpage.
  5. Manually stitch the shots together in Photoshop or Gimp.

The automatic solution is to use the Screengrab add-on for Firefox.

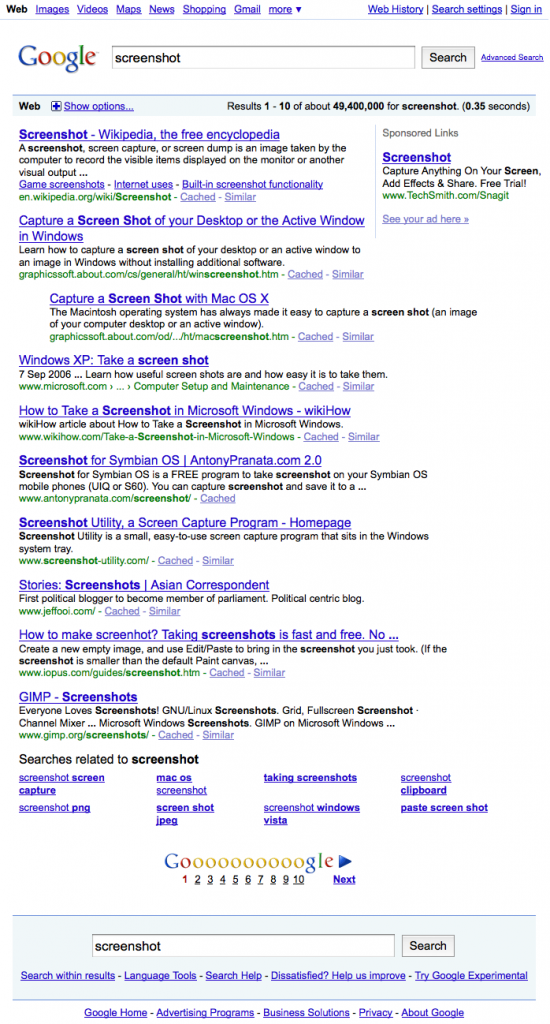
Here is an example screenshot I created using Screengrab:

Screenshot of an entire Google search results page
Screenshot of a full webpage

Screengrab can either copy the screenshot to the clipboard, or save the screenshot as an image file. Screengrab can screenshot a complete page, a complete frame, the visible portion of a page, selection of a page, or a window.

For more information about Screengrab, or to install it in FireFox, go to the Screengrab plugin page. Once Screengrab installed, just click the little icon at the bottom right of the FireFox window to take a screenshot.

If the page is very, very tall, when you save a screenshot image, it has happened to me that the PNG could be squashed vertically. Here is a workaround I use get the very tall screenshot in the right proportions on Mac:

  1. Screenshot the entire web page to the clipboard (instead of saving it to an image file).
  2. Open the Preview application.
  3. Choose File | New from Clipboard.
  4. The image will appear in the right proportions in Preview.
  5. Save screenshot from Preview in the image format of your choice.

Tested with Firefox 3.5 on Mac OS X 10.6 Snow Leopard, and FireFox 4.0 (4.0.1) on Windows 7.

Categories
Linux

How to See Hidden Files on Linux, Mac and Unix

Files and directory names starting with a dot are treated as hidden files on operating systems derived from Unix. That means you won’t normally see these dot files in Mac OS X, Linux, FreeBSD or enterprise Unix.

Linux includes Ubuntu, Red Hat, CentOS, SuSE, Debian, Fedora & Mandriva. Unix includes Enterprise Unix like AIX, HP/UX and Solaris.

Hidden files are typically used for configuration or program history. For example:

  • .bash_history contains a Unix user’s shell configuration.
    (A Unix shell is used to enter text commands.)
  • .ssh is a directory holding configuration files for SSH.
  • .bash_history keeps the history of shell commands entered.
  • .htaccess is used to override a folder’s Apache configuration.

Files are typically hidden so they don’t distract from the files people usually work with, such as documents, movies or music.

To list hidden files in a terminal session, add the -a option to the ls (list files) command. Here you can see the difference from a normal ls:

Tazs-MacBook-Air:~ taz$ cd /Users/taz

Tazs-MacBook-Air:~ taz$ ls
Backups		Movies
Desktop		Music
Documents	Pictures
Downloads	Public
Library		Sites

Tazs-MacBook-Air:~ taz$ ls -a
.
..
.CFUserTextEncoding
.DS_Store
.Trash
.Xauthority
.bash_history
.cups
.fontconfig
.lesshst
.mysql_history
.ssh
.viminfo
Backups
Desktop
Documents
Downloads
Library
Movies
Music
Pictures
Public
Sites

The cd command means change directory to.

There are two special files in this listing. The single dot file “.” is the current directory. The double dot file “..” is the parent directory. To see how this works:

Tazs-MacBook-Air:~ taz$ pwd
/Users/taz

Tazs-MacBook-Air:~ taz$ cd ..

Tazs-MacBook-Air:Users taz$ pwd
/Users

The pwd command means print working directory.

I’ve tested the commands above for working with hidden files on Mac OS X 10.7 Lion, Mac OS X 10.6 Snow Leopard (10.6.7, 10.6.8), Ubuntu Server 7.04, Ubuntu Server 10.10 LTS, Ubuntu Desktop 10.04, CentOS 5.1, 5.3 & 5.4, Red Hat Enterprise Linux 5.6, as well as ancient HP/UX, AIX and Solaris versions. They should work on nearly every Unix-based system.

Hackers sometimes hide files using dot files.

Nearly all file transfer programs provide an option to show hidden files. Dot files like .htaccess are essential for some websites to work. Dot files can be a security risk. Many file transfer programs show files starting with a dot by default.

If you have more questions about hidden files, please post a comment below.